Puzzle solution / Steam full release
Red Temple: all nine answers and what they mean
Updated 2026-11-16 · Steam full release
In puzzle order, enter 503 → 12 → 616 → 5297 → 357 → 64 → 523 → 097 → 9374. Keep the zeros in 503 and 097. Match the panel’s visual clue to the table before applying a code; the nine puzzles use different rules.
On this page
Step by step
Reach the temple entrance at (15,08)
Begin at the lift entrance in (13,07), not the button-blocked entrance. Activate the lift fully with its left-mouse-button interaction, quickly teleport to the save point at (13,05), then move one screen up and board the lift before it leaves. Ride it to the temple approach. This route assumes you can already reach that starting room and use that save point.
Order the entrance-wheel symbols
At the symbol door, arrange the glyphs in ascending numeric order, 0 through 9 clockwise. The dot counts establish the values. This entrance is a ten-symbol wheel, separate from the nine code panels inside.
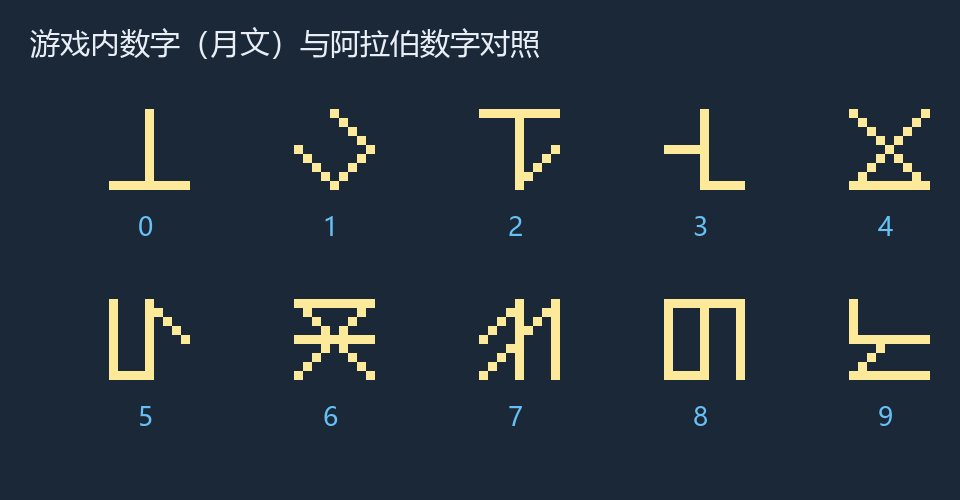 Open full-size image ↗
Match the whole shape before ordering the wheel. Glyph chart: 文丶丶叔, Steam. Choose the code by its clue
The table gives every answer. The notes below explain what to count or combine, so a different route through the room does not lead you to the wrong panel.
All nine Red Temple codes Panel Recognize the clue Enter 1 Horizontal strokes 503 2 Turns between circles 12 3 Intersections 616 4 Digits hidden in square figures 5297 5 Exclusive-or pairs 357 6 Broken mural 64 7 Highlighted overlapping lines 523 8 Dots inside triangles 097 9 References to earlier panels 9374 Puzzle 1 · Horizontal strokes: 503
Count only the horizontal strokes in each figure, in figure order. Vertical and diagonal segments do not count. Keep the middle zero.
Puzzle 2 · Turns between circles: 12
Follow each connecting line and count its turns, rather than counting circular endpoints.
Puzzle 3 · Intersections: 616
The two figures give 6 and 16. The second figure uses its symmetry: 8 doubled is 16. The input is 616, not three unrelated quantities of 6, 1, and 6.
Puzzle 4 · Digits hidden in square figures: 5297
Identify each number glyph inside its surrounding square-based figure. Read the four figures in order.
Puzzle 5 · Exclusive-or pairs: 357
Compare each pair of symbols segment by segment. Keep a line that belongs to exactly one symbol; remove a shared line. Work one column at a time.
Puzzle 6 · Broken mural: 64
Read the digits hidden in the surviving square-based figures. The missing mural piece is not an item you must retrieve.
Puzzle 7 · Highlighted overlapping lines: 523
Light the wall. Find three number symbols that together reproduce the figure, each using a highlighted line. The highlights identify input positions; the top highlight belongs to the second digit.
Puzzle 8 · Dots inside triangles: 097
Imagine a number glyph inside each grid. The dots count how many of its lines border each triangular cell. Match those local counts and preserve the leading zero.
Puzzle 9 · References to earlier panels: 9374
Use selected digits from panels 4, 5, and 6: 5297, 357, and 64. The final input is 9374, not those three whole codes joined together.
How you know it worked
Each correct input clears its matching panel. The final earlier-answer panel accepts 9374 after you enter the required digit positions.
If you are still stuck
Check the clue instead of relying only on your route order. Keep leading zeros, compare full glyph shapes, and use the correct rule: intersections, turns, and horizontal lines are three different counts. If you miss the entrance lift, return to (13,07) and repeat the activate → teleport → move up sequence.
Sources & image credits
- Full entrance route and all nine panel methods, MONOMOON.online ↗
- 文丶丶叔’s golden-feather and glyph guide (Steam) ↗
MONOMOON and its artwork belong to Gentle Giant. This guide is independent.